2 by 2 Napoleonics
by Rod
Humble
Beta version 2.g, still missing complete
army lists, abilities, point balancing and terrain setup
Introduction
The rules require no order
writing or cards. The only markes required is cotton
wool or tissue paper for indicating pinned and disrupted status. They are
designed for 2mm figures to be played on a 2ft board in an hour or less. The
rules are solo gamer friendly.
These
rules are differentiate themselves by two core mechanics.
The glue of war
This is the trait of
Napoleonic infantry to refuse to budge once it had started firing at an enemy,
this made the commitment of units an important decision as the general was
unlikely to regain control over them again for some time.
Evolving battlefield.
Napoleonic battles were
rarely “set piece” battles. Units would arrive in clumps and make their way
towards the front, often arriving from the flanks. This gives a very different
feel than a battle where the units are all lined up facing each other at the
start.
Scale
Each unit represents a
regiment or in some cases a brigade. The game can represent either part of a
larger battle or a smaller battle in its entirety.
The rules are designed for
2mm figures to be played on a 2ft by 2ft table (hence “2 by 2”) which can be
played to completion in an hour or less.
There is no ground or time
scale beyond it “feeling” right.
Basing
All units are based on 1
inch by ½ inch bases. I double up stands
on the base to try and make a more attractive appearance but single blocks
would be fine.
Sequence of play
Player 1 Moves Units/Dices
for reinforcements
Player 1 Rallys
units
Player 2 Shoots
Firearms/Artillery
Player 1 Resolves Melee’s
Player 2 Moves Units/Dices
for reinforcements
Player 2 Rallys
units
Player 1 Shoots
Firearms/Artillery
Player 2 Resolves Melee’s
Weapon ranges
Shooting
ranges (Artillery and Firearms)[1]
Foot Artillery 4/8”
Horse Artillery 3/6”
Muskets 2”
Any Infantry unit that
shoots is automatically pinned and is marked as such immediately upon firing.
A unit may shoot only ONCE
during its turn. This means if a unit is charged by two attackers only one can
be shot at.
Modifiers:
Arty at long range -1
Shooting out of flank or
rear -2
Target is cavalry +2
Target is infantry
(light/line or guards) in cover, IE: In town,
behind wall or hedge (NOT
woods) -1
Target is light Infantry in
woods -1
Target is downhill of
shooter +1
Target is disrupted +1
HQ in base to base contact
With firing unit +1
Muskets Firing “First
Volley”
ie: unit is not pinned +1
Resolving shooting
Roll 1d6
Results
8+ Target is destroyed
7 Target Routs
6 Target Disrupted
5 Target Pinned
4 or less no effect
Destroyed
– Unit is removed from play and counted towards victory conditions.
Routs –
Unit moves its maximum move either to its direct rear or directly away from the
source of the shooting. After this move is completed the unit is also
disrupted. If at any point during the rout the unit touched an enemy unit the
routing unit is destroyed. The routing unit may pass through friendly units but
if it ends its move on a friendly unit that unit is moved back to make room and
is marked as pinned.
Disrupted
– The unit is marked as disrupted
(usually by placing cotton wool or another marker on the unit). Until it
rallys the unit may not fire or move. In addition it
is more vulnerable to attacks (see factors).
Pinned –
The unit is marked as pinned (usually by placing cotton wool along the front
edge of the unit). Until it rallys the unit may not
move but is permitted to change facing during the move phase. The unit may fire
normally.
Rallying – [2]
A rally removes a disrupted
or pinned effect from a unit.
To attempt to rally a unit
must be within 6” of a HQ unit. Note that under normal circumstances it is also
impossible for a unit to rally if an enemy is within 2” of it. Exceptions being
Guards units and units whome the HQ is in base to
base contact. A HQ may always attempt to rally itself and gains a +2 bonus for
doing so. Extra HQ’s do not add additional modifiers.
Roll
1D6
Modifiers:
Guards +1
HQ in base to base contact +1
Militia -1
Enemy in contact (rallying not possible)
Enemy within 2” -2
(normally makes rallying impossible)
HQ more than 6” away (rallying not possible)
If modified score is 5+ Unit Rallys
Movement
During each movement phase
any unit which is not pinned or disrupted may move up to its full movement
allowance. Units may pivot/ wheel/ spin at no cost. Units may move sideways at
a cost of *2 distance but units may not move to contact in this manner. Units
may move directly to their rear at no additional cost.
Movement rates :
Infantry 3”
HQ 6”
Heavy Cav 4”
Light Cav 5”
Foot Arty 2”
Horse Arty 4”
Modifiers
ROAD – If a unit spends its
entire move on a road it gains +1 inch in movement.
Stream – To cross a stream
costs an extra inch in addition to the base distance.
Woods – Impassable to all
but light infantry
Hedges/ walls – No cost.
Towns do not affect
movement.
Note cavalry may cross
streams, walls ect at above movement penalties but
never receive any cover bonus for terrain.
No unit other than light
infantry may enter woods. If they are ever forced to by rout then they are
destroyed.
Melee
This phase represents a
charge or counter charge in the grand manner.
Each
player rolls 1D6
Modifiers:
Unit is Light Cavalry -1
Unit is Guards +1
Unit is Heavy Cav +2
Enemy is disrupted +2
Enemy is in melee with more
than one unit +1 per extra unit beyond 1.
(IE: 3 attackers on one
defender means each attacker gets +2)
HQ in base to base contact +1
Higher than opponent +1
Unit is Artillery/HQ/Light
Infantry -3
Results, take the difference
in scores.
Totals are drawn - -Reroll!
Difference 1 or 2 more -Loser Routs
Difference 3 or more -Loser destroyed
In the case of the loser
routing or being destroyed the winner has the option of immediately moving by
“follow up” upto a full move directly ahead if he
wishes. If this “follow up” move contacts another enemy unit then another melee
is performed. This can be repeated until no more units are contacted.
Moving to contact. If during
the movement phase the front part of the movers base contacts any part of an
enemy base then a melee is performed. Note that for a melee to occur the last
2” of the units move OR its entire move (if less than 2”) must be STRAIGHT AHEAD.
If this is not possible then he may not move to contact.
A melee occurs if any part
of the attackers base touches an enemy units base. It is possible for units
(attackers and defenders) to be engaged by more than one unit.
After a melee occurs if the
attacker was routed/ destroyed then the defender does not change facing, but
the attacker is aligned in face to face contact with the defending unit and
routs directly away. If the defender was routed then the defender aligned
himself in front base to base contact with the attacker first and THEN routs
directly away from the enemy.
HQ’s and destroyed units. If
a HQ is in base to base contact with a unit (IE: for the purposes of rallying
or combat bonuses) and that unit is destroyed then the HQ is also destroyed.
Game setup.
Each player rolls 1 D6
If the dice are tied then
each player may place an extra 10AP at the start of the game. Players then
re-roll, it is possible in this manner for all the AP’s to be setup at the
start of the battle eventually.
The player with the higher
score is the attacker. The player with the lower score is the defender.
The defender places 10AP
of units within 6” of his base edge but
no closer then 3” to the side of the board.
The attacker places 10AP of
units within 6” of his base edge but no closer then 3” to the side of the
board.
The defender then picks a
reinforcement point anywhere on his defending edge of the board and places the
reinforcements he intends to arrive there next to it in order of appearance.
The attacker then picks a
reinforcement point anywhere on his edge of the board OR anywhere on either
flank that is not within 6” of a defending unit or reinforcement point. He then
places the reinforcements he intends to arrive there next to it in order of
appearance.
The defender then picks a
second reinforcement point anywhere on his defending edge of the board and
places the reinforcements he intends to arrive there next to it in order of
appearance.
The attacker then picks a
second reinforcement point anywhere on his edge of the board OR anywhere on
either flank that is not within 6” of a defending unit or reinforcement point.
He then places the reinforcements he intends to arrive there next to it in
order of appearance.
The defender then takes the
first move.
Reinforcements –
Napoleonic battles were
distinctive in how often a battle was determined by the timely arrival or
delayed arrival of reinforcements often on the flanks of the enemy. 2 by 2
Napoleonic battles are rarely simple affairs where both sides line up their
armies then the battle begins. The feeding in of forces is an essential part of
the game. Some players will indeed choose to wait for all their forces to
arrive from the rear then form a long battle line before engaging the enemy.
This could well be a winning strategy, however it requires the assent of the
opposing general who may have other ideas, or perhaps not in which case a grand
set piece battle will result.
Each movement Phase at any
time during it the phasing player may dice twice for reinforcements.
Roll 1D6
Reinforcement from rear 3+
required
Reinforcement from flank 4+
required
Reinforcements must arrive
in the order they were laid out at the start of the battle. A reinforcement may
be placed at any point on the board edge within 3” of the reinforcement point.
If an enemy unit is within
3” of the reinforcement point then the reinforcing player may at his option
remove the enemy unit and the successfully reinforcing unit he was about to
place on the board and mark them both destroyed for purposes of victory
conditions. Conversely if during his move a phasing player exits one of his
units off the board at an enemy reinforcement
point he removes his unit and the next off map reinforcement
unit. Both destroyed units
count towards victory conditions.[3] It
costs 1” worth of movement front base fully lined up with the boards edge to
exit the board.
No reinforcing unit may
physically start on top of or move through another unit when it enters the
board. If there is no place available within 3” of the reinforcement point it
may not enter that turn.
Measuring ranges
When the rules ask for a
range to be measured or to see if a units is within X inches of a unit then the
measuring point is the center of the nearest face to any edge of the target
base.
Victory Conditions
At the start of the game
players may decide on a “fast” or “decisive” game. A “decisive” game can last
longer but gives a slightly more agreeable result, “fast” games are usually
over in less than an hour and are a very much sudden death games.
“Fast” games are lost by the
first player who has 5 units destroyed.
“Decisive” games are lost by
the first player to lose 5 units or more AND who has lost 2 more units than his
opponent.
Draws are possible and
common in 2 by 2 Napoleonic’s. A player may start to play for a draw only after
EITHER side has no reinforcements left (IE: he or his opponent has brought on
table all of his units). If he then exits all of his units off his table edge
then he achieves a draw. Note that units FORCED off the table by routing count
as destroyed and so towards victory so this exiting strategy is difficult to
pull off. If playing for a draw players are advised to first disengage their
infantry from the enemey then use artillery and
cavalry to cover the retreat with cavalry being the last off the board.
Units
HQ – A HQ does not just
represent a general and his staff it also represents his signals and area of
interest. HQ’s will often be found flitting across the battle field from flank
to flank allowing units to rally as they get near. Some armies allow for more
than one HQ at once in an army which is a powerful advantage.
Line Infantry – The army’s
backbone. Cheap, reliable and likely to be the vast majority of your force.
Excellent at holding strong points. However once an infantry unit starts
firing, it is automatically pinned and is hard to get moving again.
Guards / Grenadiers – The
elite of the army, whatever they are called. Better at melee and also more able
to rally. However if a Guards unit routs then ANY unit it passes within 1” of
during its rout also routs, if this other unit as also a guard then the chain
continues.
Heavy Cavalry – Heavily armoured and a terrible sight to behold. The masters of
melee combat. Should not be used to charge non disrupted infantry front unless
you are feeling lucky.
Light Cavalry – Great for
dashing across the battlefield but a weak unit. Best used to finish off a
disrupted unit. Light Cavalry may during its movement phase voluntarily ROUT.
This is particularly useful if pinned in a vulnerable position. However it
should be noted voluntarily routing units are still destroyed on a 1 or a 2 as
per the routing rule.
Light Infantry – These are
relatively rare full skirmishing units. Not to be confused with small packets
of skirmishers which comprise many units of the period. Light Infantry treats
any result due to shooting PINNED result. In other words a light infantry unit
cannot be routed or destroyed due to shooting. In addition Light Infantry may
during its movement phase voluntarily ROUT. This is particularly useful if
pinned in a vulnerable position. However it should be noted voluntarily routing
units are still destroyed on a 1 or a 2 as per the routing rule.
The Flow of
2 by 2 Napoleonic games flow in a manner which reflects my reading of the period and
accounts battles. It is my conceit that a game of 2 by 2 Napoleonic’s when retold will sound much like the narrative
of a real battle. Certain patterns emerge in 2 by 2 games which is good to know
in advance.
Infantry should be wary about firing
As the rules state when an
infantry units shoots its muskets it becomes PINNED. As there is is likely to be an enemy unit within 2” then it becomes
impossible to rally that unit unless it is Guards or in base to base contact with
a HQ. Infantry of the time usually had one single good volley then every man
started firing as fast as he could often blindly into the smoke ahead, once a
unit started firing thus it was incredibly difficult to get it to stop. In
particular if you are on the attack then you should avoid firing as your attack
will stall. Like commanders of the time you should insist on your troops using
the bayonet as the weapon of the offense.
That said an infantry units
“first volley” IE: before it becomes pinned can be incredibly effective
especially against cavalry.
Cavalry is best against disrupted units
You will be tempted to use
your cavalry, especially heavy cavalry, as a metal fist with which to smash the
enemies line. Be cautious. Cavalry is almost certain to lose against infantry
whether it is pinned or not. Remember infantry can turn to face when charged so
it is impossible to “catch” a unit in the flank except if you charge the unit
with two attackers. This is a deliberate design decision as formed infantry could
almost always form a square and become invulnerable to cavalry.
This is not to underestimate
the power of cavalry, a fast reserve force than can threaten breakthroughs and
finish off disrupted units is an essential part of any force. In particular cavalry
can pose a terrible threat to HQ units caught out I the open.
Cavalry is also the king of
the multiple melee turn. It IS possible for a cavalry unit to destroy multiple
units in a single turn by use of follow up.
HQ’s and the center
As you will have noticed in
the rules to rally a unit needs to be within 6” of a HQ and normally you only
have 1 HQ. Even with a movement rate of 6” HQ’s will need to be crossing the
center of the board quite often if the are to serve both flanks. If the center cracks then entire armies can
be cut in two. In addition HQ’s can give special attention to critical units by
getting into base to base contact with them. To lead a special charge, aid in a
critical defense or help rally a stricken unit.
Army Lists
Players may pick an army
size to fight, the standard army points (AP)
total for pickup games is 100
French
1-2 HQ 4AP
0-16 Line Infantry 2AP
0-6 Guards/Gren 3AP
0-4 Heavy Cavalry 3AP
0-6 Light Cavalry 3AP
0-4 Foot Artillery 3AP
0-2 Horse Artillery 4AP
Standard template: 16 units
1 HQ 4 AP 4 4
10 Line Infantry 2AP 20 24
2 Light Cavalry 3AP 6 30
1 Heavy Cavalry 3AP 3 33
2 Foot Arty 4AP 8 42
Austrian
1-2 HQ 20 4AP
0-16 Line Infantry 10 2AP
0-2 Guards/Gren 15 3AP
0-6 Heavy Cavalry15 3AP
0-6 Light Cavalry 15 3AP
0-4 Foot Artillery 15 3AP
0-1 Horse Artillery20 4AP
French
1-2 HQ 20 4AP
0-18 Line Infantry 10 2AP
0-4 Guards/Gren 15 3AP
0-3 Heavy Cavalry15 3AP
0-2 Light Cavalry 15 3AP
0-4 Foot Artillery 15 3AP
0-2 Horse Artillery20 4AP
Examples of play
Shooting:
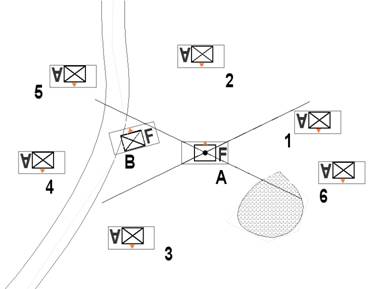
French artillery unit A can
shoot at one of Austrian infantry units 1,2 and 3.
Only unit 2 is to its front
and so units 2 & 3 use the “shooting out of flanks or rear” -2 modifier.
Units 4& 5 cannot be
shot at because friendly unit B blocks the line of sight which is taken from
the two widest points of the shooters base relative to the two furthest points
of the targets base.
Unit 6 is also blocked by
woods
Measuring range
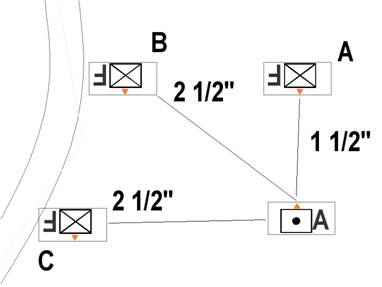
The Austrian Artillery unit
measures distance to his possible targets. Note he uses his front center edge
to unit B because he is shooting out of his front at that unit. He uses his
side center point as he is shooting out of his flank at unit C.